Tengo miles de pendientes, sin embargo quería hacerme un pequeño momento para poner una canción que acabo de conocer a traves de un servicio del cual me enamoré...y sí no es ningún "adult service". El servicio del cual hablo es blip.fm, es una combinación de twitter con youtube y te crea playlists, todo mundo es un DJ con sus comentarios graciosos a las rolas que les laten... En fin, atraves de ese servicio conocí esta canción, no sé exactamente por qué pero me fascinó. Es una canción alemana y le hago tributo traduciendola al español! Aquí esta la trAducción de la rola de 2raumwohnung -> translation to spanish Translation to spanish! Por cierto, de nuevo doy gracias a mis clases del cele que me permiten hacer esto. Comentarios de la traducción son bienvenidos, tuve algunas dudas en varias partes de la canción, tonz apreciaría cualquier comentario al respecto... Enjoy!
Wir Trafen uns in einem Garten Wir Trafen Uns In Einem Garten, Wahrscheinlich Unter Einem Baum. oder War´s In Einem Flugzeug, - Wohl Kaum - Wohl Kaum.
es War Einfach Alles Anders, Viel Zu Gut Für Den Moment, wir Waren Ziemlich Durcheinander Und Haben Uns Dabei Getrennt.
komm´ Doch Mal Auf Ein Stück Kucken, Später Geh´n Wir In Den Zoo. und Dann Lassen Wir Uns Suchen - Übers Radio.
ich Weiß Nicht Ob Du Mich Verstehst Oder Ob Du Denkst Ich Spinn´, weil Ich Immer Wenn Du Nicht Da Bist Ganz Schrecklich Einsam Bin.
dann Denk Ich Mal An Was Anderes Als Immer Nur An Dich denn Das Viele "an Dich Denken" Bekommt Mir Nicht. am Nächsten Tag Bin Ich So Müde, Ich Pass Gar Nicht Auf. und Meine Freunde Sagen Ich Seh Fertig Aus.
es Hat Seit Tagen Nicht Geregnet, Es Hat Seit Wochen Nicht Geschneit. der Himmel Ist So Klar - Und Die Straßen Sind Breit. ist Das Leben Wie Ein Spielfilm Oder Geht´s Um Irgendwas? wir Haben Jede Menge Zeit Und Du Sagst :"na Ich Weiß Nicht - Stimmt Das?"
fahr Doch Mit Mir Nach Italien, Wir Verstehen Zwar Kein Wort aber Lieber Mal Gar Nichts Verstehen Als Nur Bei Uns Im Ort
dann Denk Ich Mal An Was Anderes ... (... Und Meine Freunde Sagen: "man Siehst Du Fertig Aus")
alle Fenster Haben Gardinen, Ich Geh Alleine Durch Die Stadt. ich Frag Mich Ob Mich Jemand Liebt, Der Meine Telefonnummer Hat? warum Immer Alle Fernsehen? Das Macht Doch Dick! ich Stell Mit Vor Ich Wär´ Ein Fuchs In Einem Zeichentrick
Nos topamos en un jardín.
Nos encontramos en un jardín, talvez fue más bien debajo de un árbol. O fue en un avión-no no
Todo fue simplemente diferente, demasiado bueno para el momento, aunque estábamos un poco confundidos y desde allí nos separamos. :( Andale ven a tomarte un pedacito de pastel, después podemos ir al zológico, y dejamos que nos búsquen --por el radio. Yo no sé si me entiendas, o pienses que estoy loca, Porque siempre que estás lejos, me siento horriblemente sola. Entonces en vez de estar todo el tiempo pensando en tí, pienso en otra cosa, porque estar pensando mucho en ti, no me sienta muy bien.
Al día siguiente estoy muy cansada, no puedo poner atención a casi nada. Y mis amigos me dicen que me veo acabada!
Desde hace un par de días no ha llovido, desde hace un par de semanas no ha nevado, el cielo está tan frío y las calles están tan amplías, la vida es como una película, o acaso es para otra cosa?
Tenemos ambos un gran cacho de tiempo libre, y tu dices: ah neta? es cierto esto?.
Andale viaja conmigo a Italia, no vamos a entener nadita, pero es mejor no entender nadita a estar en nuestra casa todo el tiempo.
Entonces en vez de estar todo el tiempo pensando en tí, pienso en otra cosa ...(..Y mis amigos me dicen que me veo acabada!)
Todas las ventanas tienen cortinas, camino solitaria por la ciudad. Me preguntó a mi misma, si me ama ese individuo que tiene mi número telefónico. Y por qué todos ven la Tele? Te hace verte gordo, no??! Me imagino como si yo fuera un zorro dentro de una animación.
We will explain here, how to carry out the Harris Corner Detector Algorithm in Matlab. We will divide the task in 2 parts, one part will calculate the corner points of the image, and the other part, will draw small squares around those corner points with the purpose of having a way of displying them to the user. The part of detecting the corner points of the image is the following:
%we create a function named harris that receives an rgb image %and the desired k value. We will return a matrix named A that %has information about whether or not a certain pixel represents %a corner. function [A] = harris(rgb, k)
%If we received an RGB image we convert it to Gray Scale. %We do this, because if we were to work with an RGB image it %would be necessary to work with 3 channels, the red, green and blue channel, %instead of just one, which is possible with the gray scale image .
%Before , we continue , it is important to recall that in the Harris Corner Detector, %we obtained a weighted sum of squared differences between an area (uv) and %another area that was obtained by shifting the original area by (x,y), and thus we %had the following form:
%w(u,v) represented a weighted sum. It is important to note that I(u + x,v + y) %can be approximated by a Taylor expansion.
%Where Ix and Iy are the partial derivatives of I. %Resulting in:
%Since we will carry out an operation that involves partial derivatives we need to %carry out a smoothing, because computation of derivatives generally involves a %stage of scale-space smoothing. For this,we will use the convolution of the gray %image with a Gaussian kernel. So the next steps that we will carry out are: a) Calculate the partial derivatives with respect to X and to respect to Y of the image. This will give us the gradients with respect to X and with respect to Y. b) convolve these gradients with a Gaussian Kernel. The following is our Gaussian Kernel, which will give us blurring on both directions%
g = 1/16 * [1 2 1; 2 4 2; 1 2 1];
%Here we define the Gradients Operators, we will use the Prewitt Gradient Kernel to obtain the gradients. If we pay more attention to this matrix, we notice that this kernel considers that the orthogonal and diagonal pixel differentials equally
dx = [-1 0 1; -1 0 1; -1 0 1]; %Prewitt Gradient Kernel in X dy = dx';
% We obtain all the partial derivatives in x and y of the image. These are the %Gradient values. Ix = conv2(img, dx, 'same'); Iy = conv2(img, dy, 'same'); % We obtain a matrix, that will have the product of Ix*Iy for all Ix and all Iy Ixy= Ix .* Iy;
% We will now obtain the square value of Ix and of Iy and we will obtain a blurring of Ix square,Iy square and of Ixy.The blurring will be carried out by using the gaussian kernel.We need those square values , since let's recall we had the following:
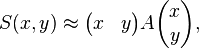
Which produces the approximation
which can be written in matrix form:
where A is:
%So we calculate the values that are inside this matrix.
%We now have 3 matrices , Ix2 that hold the values of all the xs in the image, but they are squared and have been convolved with a Gaussian, so all the xto the square values are blurred a bit. It is important to note, that this operation helps to reduce noise. It smooths the image. We have another matrix Iy2 with the ys to the square value and also blurred as well as third matrix Ixy that holds the values of all the x's times their corresponding y. All 3 of these matrices will help us to calculate the Harris corner response that each pixel of the image has. The Harris Corner response for each pixel will come out of a matrix A, that as we had said before handwas conformed of:
%Where Ix represents the x value of the pixel, and Iy the y value of the pixel. The Harris Corner response %of a pixel will be Mc:
%What our Harris Function will return will be a matrix that will hold the harris corner response for each %one of the pixels that conform the image:
A = (Ix2.*Iy2 - Ixy.^2) - k * (Ix2 + Iy2).^2;
end
We will now write the function that draws a small red square around the detected corner points.
%This function receives the image we wish to detect and draw the corner points of, %it also receives the desired k value to use, and the desired threshold. It is %important to remember that in the Harris corner detector, we consider a corner %to be a corner when the measure of corner response surpasses a certain %threshold. This measure is computed through the determinant and the trace of the % matrix.
function img_h = project1(img, k, threshold) %We store the original image in img_h, we need to store it, since we will draw the %squares denoting the corners above it. img_h = img; %We use the function we had defined above and with it obtain a matrix that holds %all the corner response measures for all the pixels of the image% M = my_harris(img, k);
%We iterate through the whole matrix for x = 2 : size( M, 1 ) for y = 2 : size(M, 2) %If we find a point of the matrix, that has a value above the threshold, then that %point is a corner and we will draw a rectangle on that pixel. if M(x,y) > threshold for xpos = x - 1:x+1 img_h(xpos,y-1,1) = 255; img_h(xpos,y+1,1) = 255; end
for ypos = y - 1:y+1 img_h(x-1,ypos,1) = 255; img_h(x+1,ypos,1) = 255; end end end end
end
We now present a image that was used for this purpose. The original image is: And the image with the corners detected is:
In many robotic problems it is necessary for the machine to be able to detect the depth and distance of certain objects sometimes to avoid obstacles and other times to retrieve with precision a certain object from the scene. To accomplish this, the robot is usually equipped with 2 cameras that take pictures of the environment they are in. These 2 cameras commonly hold a distance from each other, a distance similar to the one we present with our eyes, due to it, the pictures from one camera are slightly shifted with respect to the ones taken by the other camera. This shift is usually denominated disparity and is what the computer uses to know whether an object is close by or far away. One major problem that the machine encounters while carrying out this task, is how does it detect that the red cup in picture 1 is moved , let's say, 4 cm with respect to where the red cup is in picture 2? These vision tasks require finding corresponding features across 2 or more views.
Therefore the first necessary step is to find the features of a scene. But how do we do this?
What we can start doing is making image patches.Elements to be matched are image patches of a fixed size..The task is therefore to find the best (most similar) patch in the second image, it is clear that the chosen patch should be very distinctive (there should only be one patch in the second picture that looks similar). One good patch is one that presents large variation in the neighborhood of a point in all directions. For example Take the following 2 images:
A good patch image patch could be:
while a bad one, because it has many matchings is:
We are looking for stable features over changes of view points. One type of features that maintain this type of characteristic are Corners. The Harris Corner detector provides a mathematical tool for finding them. With an image patch, we can have the following cases: a) The patch represents a 'flat' zone. b)The patch represents an edge . c) The patch represents a corner .
A Flat region as we can see from the above image, presents no change in all directions, an edge presents no change along the edge direction, and a corner presents significant change in all directions. This means that if we shift the window of where we are gathering the patch image, we should perceive a large change in appearance. The Harris Corner Detector gives us a way to determine which of the above cases hold. But how does it do it exactly???!
The Harris Corner Detector utilizes the following expression: E (u,v)=∑ W(Xi,Yi)[I1(Xi+U,Yi+V)-I0(Xi,Yi)]^2 W(Xi,Yi) is a window function. Which sets:
I0(Xi,Yi) is the intensity that is present in the pixel located in (Xi,Yi) and I1(Xi+U,Yi+V) is the intensity located in the pixel Xi+U,Yi+V it is called the shifted or displaced Intensity. It is easy to see that to detect corners, we want points where E(u,v) is very large. Using Taylor's first order approximation and matrix algebra the above expression can be rewritten as:
Where M is a 2x2 matrix computed from image derivatives.
The classification can be carried out by analyzing the eigenvalues of the M matrix.
The measure of the corner response is actually set by: R=(determinant of M)+k(trace of M)^2 Determinant of M=λ1λ2 Trace of M=λ1+λ2 K is an empirical constant that varies from .04-.06
For corners R tends to be very large. For edges, R tends to be a very large negative number. For flat areas R tends to zero.
Our cellphones are nowadays an item, which we are very much accustomed to bringing along to every single place we go to. They are also devices that are very similar to little computers with multiple sensors and interaction modalities, they are equipped with GPS, Bluetooth, accelerometers, cameras, microphones,magnetometers,keyboards, and touch-sensitive displays,they also have great computation power and memory,graphics capabilities, and various communications capabilities. All of these elements aside from providing a novel multi modal user interface experience give the means through which cellphones are a perfect device for tracing human activity. With all of the cellphone's sensors, one can obtain a collection of data, that is related with what a person did through out the day, then by using data-mining algorithms one can infer human relationships and behaviors, this is often refereed to as Reality Mining. The MIT Media Lab gives a far more formal definition of what Reality Mining is: "...R.M defines the collection of machine-sensed environmental data pertaining to human social behavior..."
The problem that is currently being faced is to understand exactly how the joint use of multiple modalities,like for example location and proximity to others, help understand a person’s routines. It is important to point out that many issues actually arise when one wishes to understand patterns in the life of an individual. It is not simple to automatically infer a person's activities as well as efficiently represent them . For example, having a stay home alone Thursday and a Thursday of Beer Hotness with friends at your place define entirely different social situations, yet they could be considered identical from the sole perspective of location. It is thus very important to have detailed descriptions of the activities done by a person for characterizing the users and their habits.
The big impact that reality mining has on us, is that it is able to create models of individual as well as group behavior from the recollected data, this could enable smart personal assistants, as well as monitoring of personal and community health.
Ya tengo por fin mi nuevo telefono!! Muchas gracias a mi querida universidad, la cual para una de las materias que estoy llevando consiguió una donación de nokia y nos regalaron a todos los alumnos un n900! Las cosas sí que han sido ahora divertidas =)
Anyway,hoy hablaremos acerca de como utilizar gstreamer dentro del celular para poder hacer lindos programitas que puedan involucrar musica o incluso video! =) Para empezar es importante entender lo que es Gstreamer y como es que nos ayuda a hacer applicaciones multimedia. Gstreamer es un framework de multimedia que te ayuda a crear, editar y tocar multimedia al construir unos "pipelines" (como líneas de ensamblaje) que poseen elementos de multimedia. Simplemente se crea un pipeline, la cual posee muchos elementos que entre sí permiten que la musica se pueda tocar o que un video se pueda ver. Funciona de un modo muy similar a como son las líneas de ensamblaje en Linux/BSD/UNIX.
Con Gstreamer se atan a los elementos entre sí, y cada elemento lleva acabo algo en particular. Para demostrar esto, en una terminal escribe lo siguiente:
Cuando la línea anterior se corre, se escucha de pronto la grandiosa melodía de "...ni lo amigos saben que es lo que me paaasa,(...)con la ilusión del primer amor desesperado te amoooo..." ...ah good times ñ_ñ. El comando gst-launch-0.10 se puede utilizar para correr pipelines de GStreamer y cada elemento esta ligado entre sí mediante el símbolo !. Puedes pensar que el ! es similar al pipe | que usas en la línea de comandos normalmente. Ahora bien, como se pueden dar cuenta tenemos una serie de diversos elementos dentro de la línea de ensamblaje, estos son: * filesrc – Este elemento permite cargar archivos que esten dentro del disco duro. Al ladito de este elemento se debe poner la dirección y el archivo que se quiere cargar * decodebin – Necesitamos algo para poder descifrar al archivo que se acaba de cargar. Este elemento detecta el tipo de archivo con el cual deseamos trabajar y construye un elemento que lo decifrará. * audioconvert – El tipo de información que posee u archivo de sonido y el tipo de información que necesitamos salga de las bocinas son diferentes, así que usamos a este elemento para hacer un buen mapeo entre lo que se tiene en el archivo de sonido y lo que se escuchará. * alsasink – Este elemento escupe todo el audio a tu tarjeta de sonido usando ALSA.
Me parece que ya es claro que Gstreamer trabaja como un línea de ensamblaje, cada elemento le da como entrada al siguiente elemento su salida. Ya que nos es claro que pex con Gstreamer, haremos ahora un pequeño código en C para probarlo. Haremos un pequeño hola_mundo.c para Gstreamer. Desde la línea de comandos diremos que queremos que se toque y deberíamos posteriormente escuchar la cancioncita =) El código, que usaremos es el siguiente:
Ahora bien, si lo quieren probar en su tablet de n900, lo que deben hacer es abrir su scratchbox, utilizar el target u objetivo de ARMEL, ( se pueden cambiar a ese objetivo escribiendo desde scratchbox: sb-conf se FREMANTLE_X86) y desde allí compilar el archivo, una vez que se tenga compilado, mediante scp pasaremos el binario a nuestro celular y ese binario será lo que correremos. Para pasarlo a nuestra tableta de n900, es necesario primero saber el ip de nuestro celular, para hacerlo nos vamos al menu de applicaciones y hay un ícono que dice: More, ó Más, ó Mehr, dependiendo del idioma en que lo tengan configurado, dentro de ese ícono existe una ventanita negra, llamada X terminal, lo abrimos y tendremos la consola del celular! Allí simplemente escribimos ifconfig y apuntamos la dirección ip que se nos muestra. Ahora,desde nuestra PC en scratchbox en el target de ARMEL escribimos:
scp gstreame user@192.168.0.12:
en donde gstreame es el binario que queremos pasar a nuestra tableta y 192.168.0.12 es la dirección IP de nuestro celular. Para correrlo en la tableta n900, desde la consola X escribimos:
./gstreame "file://$PWD/test.wav"
En donde test.wav es el archivo que se escuchará. Es necesario escribirlo de esta forma debido a que el programa recibe una URL. Y con esto, ya hemos ehcho un pequeño programa que toca musica desde nuestro n900!
Los dejo con un videito casero malo que hice,(non-ameteur porn) que muestra mi nuevo smart phone tocando una estación alemana, oh sí! el programa como recibe URI puede tocar estaciones de radio!! =) Felices Hackeos!
Siendo que recibí muchas peticiones al respecto, he decido que expondré como hacer otra pequeña aplicación para el nokia n900. Hoy expondré cómo hacer un programa para visualizar imágnes. La dinámica es muy sencilla, el usuario en un textbox escribirá la dirección de la imágen que se desea visualizar y la aplicación buscará la imágen y la desplegará.
En el post anterior habia explicado como se podía hacer un pequeño hola_mundo.c para nuestro celular nokia n900, usaremos este mismo principio para hacer esta aplicación. Para hacer la parte gráfica usaremos GTK. Quien necesite más ayuda en entender que demónios es GTK, recomiendo esta lectura. Lo primero que haremos es el programa en C. Antes de emepzar el código, sería importante explicar como se manejan los eventos con GTK. Cuando digo eventos, me refiero al hecho de que el usuario oprima un botón por ejemplo. Cuando sucede algo así, debemos tener alguna manera de poder detectar que eso sucedió, y de decir, hmm el usuario oprimió el botón de enviar, entonces quiero, por ejemplo, leer lo que el usuario escribió en el textbox, y procesar después esa información. Con GTK para poder hacer esto, lo que debemos hacer es conectar las señales que envía el botón (señales de que ya fue oprimido) con alguna función que hará lo que deseamos que suceda cuando se oprima ese botón. La función g_signal_connect, logra esto. La funcion recibe los siguientes parámetros: g_signal_connect(Objeto_Que_Emite_Las_Señales,tipo_de_señal_a_detectar,funcion_que_procesará_la_info,variable_a_procesar_en_la_funcion). En este caso, esa función, nos quedaría de la siguiente manera: g_signal_connect (G_OBJECT(button), "clicked",G_CALLBACK (on_button_clicked),&valorcitos);
En donde on_button_clicked, es la función que procesará que se hará cuando se oprima el botón.Y valorcitos, es de hecho una estructura que guardará todos los valores que queremos modificar en la función cuando se oprima el botón. En este caso, se escojió una estructura, porque en sí, sólo se puede enviar una variable a la función de on_button_clicked. Pero en este caso, necesitamos minímo enviar dos: la variable de tipo imagen, y la variable de tipo textbox, pues necesitamos leer lo que el usuario escribió, y dependiendo de eso, desplegar la imagen adecuada.
Resumiendo...Nuestro código nos quedaría de la siguiente forma:(Disculpen que los comentarios esten en inglés,no sé que me está sucediendo que programo ya con comentarios en inglés..:-(
/* Program that displays a desired image specified by the user. by:saiph*/
#include stdlib.h/* EXIT_* */ #include stdio.h /* Introduce types and prototypes of GTK+ for the compiler. */ #include gtk/gtk.h
/*This struct will store some of the variables that will be modified when the user clicks the button */
/*The function that will say what will happen when the user clicks the button, user_data stores the variables that we need to retrive from the main function to play around with. */ G_MODULE_EXPORT void on_button_clicked(GtkButton *object, gpointer user_data) {
gchar * name_file; /*gchar will store the name of the image that we wish to display*/ struct values *valorcitos; valorcitos=user_data;/*we obtain a struct that stores the needed variables.*/
// we read the name of the image that the //user wants to display name_file=(gchar*)gtk_entry_get_text(GTK_ENTRY (valorcitos->entry));
/* we check to see if the image exists. If it does, we will display it!=) If not, we will print a label that says it doesn't */
if(g_file_test(name_file, G_FILE_TEST_EXISTS)) { /*The image exists, we will first remove the previous image we had*/ gtk_container_remove(GTK_CONTAINER (valorcitos->vbox),valorcitos->image); g_print ("File found it is %s. \n",name_file); /*We read and assign the desired image to our variable image*/ valorcitos->image= gtk_image_new_from_file((gchar*) name_file); /*We remove the pervious label we had, since it would say that the image was not found. */ gtk_container_remove(GTK_CONTAINER (valorcitos->table),valorcitos->label); /*We set the adequete value for our lable*/ valorcitos->label = g_object_new(GTK_TYPE_LABEL, "label", "Ex:pumas.jpg or pics/1.jpg", NULL); /*we place our lable adequetely where it belonged*/ gtk_table_attach_defaults((GtkTable * )valorcitos->table,valorcitos-> label,0,1,2,3); /*we show our lable*/ gtk_widget_show(valorcitos->label); /*we place the image where it belongs*/ gtk_box_pack_start(GTK_BOX( valorcitos->vbox),(valorcitos->image),FALSE, FALSE,0); /*we show our image*/ gtk_widget_show(valorcitos->image);
}
/*the image that the user wanted to see was not found*/ else { g_print ("File not found. \n"); /*we remove the lable we had, since we wnat to tell the user that the image was not found*/ gtk_container_remove(GTK_CONTAINER( valorcitos->table),valorcitos->label); /* we prepare the lable to say that the image was not found*/ valorcitos->label = g_object_new(GTK_TYPE_LABEL, "label", "That image was not found!", NULL); /*we place the lable adequetly*/ gtk_table_attach_defaults((GtkTable * )valorcitos->table,valorcitos-> label,0,1,2,3); gtk_widget_show(valorcitos->label); /* we remove the previous image that we were displaying.*/ gtk_container_remove(GTK_CONTAINER( valorcitos->vbox),valorcitos->image);
}
} int main(int argc, char** argv) { /* we create a struct that will store the variables that we will use when the button is clicked.*/ struct values valorcitos;
/* We create the other GTK+ widgets which we will use */ GtkWindow* window;
GtkWidget *label;
GtkWidget *button; /* Initialize the GTK+ library. */ gtk_init(&argc, &argv);
/* Create a window with window border width of 12 pixels and a title text. */ window = g_object_new(GTK_TYPE_WINDOW, "border-width", 12, "title", "Image Viewer", NULL);
/* Create the label widget. */ label = g_object_new(GTK_TYPE_LABEL, "label", "Type in the address of the image:", NULL); /*Prepare the lable we will modify when the user clicks the button*/ valorcitos.label = g_object_new(GTK_TYPE_LABEL, "label", "Ex:pumas.jpg or pics/1.jpg", NULL); /*prepare the textbox*/ valorcitos.entry=gtk_entry_new(); int text_width =5; // Width of field in characters gtk_entry_set_width_chars( GTK_ENTRY(valorcitos.entry), text_width); /*prepare the image*/ valorcitos.image=gtk_image_new(); /*prepare the button*/ button=gtk_button_new_with_label("OK"); /* connect the signals to the button, when clicked we will call the on_button_clicked function and send in the struct valorcitos that stores the variables we need to manipulate* */ g_signal_connect (G_OBJECT(button), "clicked", G_CALLBACK (on_button_clicked),&valorcitos);
/*We prepare a virtical box that will store a table and the image*/ valorcitos.vbox=gtk_vbox_new(FALSE,0); /*we prepare a table that will store the textbox,lables and button*/ valorcitos.table= gtk_table_new(1,1,TRUE); /*We pack the table with the variables */ gtk_table_attach_defaults ((GtkTable * )valorcitos.table,label,0,1,0,1); gtk_table_attach_defaults ((GtkTable * )valorcitos.table,valorcitos.entry,0,1,1,2); gtk_table_attach_defaults((GtkTable * )valorcitos.table,valorcitos.label,0,1,2,3); gtk_table_attach_defaults((GtkTable * )valorcitos.table,button,1,2,1,2);
/*we add the table to the vbox*/ gtk_box_pack_start(GTK_BOX( valorcitos.vbox),valorcitos.table, FALSE, FALSE, 0); /*we add the image to the vbox*/ gtk_box_pack_start(GTK_BOX( valorcitos.vbox),valorcitos.image,FALSE, FALSE, 0);
/* Pack the vbox into the window layout. */ gtk_container_add(GTK_CONTAINER( window), GTK_WIDGET(valorcitos.vbox));
/* Show all widgets that are contained by the window. */ gtk_widget_show_all(GTK_WIDGET( window));
/* Start the main event loop. */ g_print("main: calling gtk_main\n"); gtk_main(); /* Display a message to the standard output and exit. */ g_print("main: returned from gtk_main and exiting with success\n");
/* The C standard defines this condition as EXIT_SUCCESS, and this symbolic macro is defined in stdlib.h (which GTK+ will pull in in-directly). There is also a counter-part for failures: EXIT_FAILURE. */ return EXIT_SUCCESS; }
Con esto tenemos ya listo el codigo, y ahora sólo falta compilar y correrlo. Para ellos, llevaremos acabo los siguientes pasos. 1)Correr Xephyr, para ello desde una terminal escribimos simplemente: Xephyr :2 -host-cursor -screen 800x480x16 -dpi 96 -ac Y se nos deberá abrir una ventanita negra. 2)Preparamos todo en scratchbox -En otra terminal, escribimos /scratchbox/login -Creamos el programa que ejutaremos: nano imagencitas.c y alli pegaremos el código que acabamos de escribir. - Compilamos el programa: gcc -Wall -g imagencitas.c `pkg-config --cflags gtk+-2.0 gmodule-2.0` -o imagencitas `pkg-config --libs gtk+-2.0` `pkg-config --libs gmodule-2.0` -Preparamos el ambiente para dibujar en el Xephyr : En una consola escribimos: export DISPLAY=:2 af-sb-init.sh start
Y ahora simplemente con el siguiente comando correremos nuestro programa: run-standalone.sh ./imagencitas
Y con esto deberíamos tener los siguiente:
Allí el usuario ha escrito que quiere ver la Imágen Pumas, pero aun no aprieta el botón. Una vez que lo haya apretado tendríamos lo siguiente:
Y si el usuario escribiera el nombre de una imágen que no existe dentro del sistema, recibiría lo siguiente:
Y así es como, se podría crear una aplicación para ver imágenes en el n900. Supongo que el código está medio sucio, pero es mi primera vez usando GTK y tengo además muchas otras responsabilidades...=( Espero seguir jugando con esto, y mejorando. Los dejo con la imágen de un comic, que me dió mucha risa:
Hoy desperté con un humor muy peculiar, sentí de pronto unas INMENSAS ganas de tener un celular nuevo, y cuando digo un celular nuevo, realmente me refiero a lo más más nuevo. I'm talking about the NEW Nokia phone! Sí el neuvo celular de nokia, que aún no sale al mercado. (Yo ya tengo mi pre-order listissimo.) El nokia n900.
¿Que cosas tiene el n900? En su página algunas de las especificaciones son:
*Procesador de tipo ARM CortexTM-A8 corriendo a 600 MHz. El cual es el primer procesador de aplicaciones basado en la arquitectura ARMv7 y es actualmente el procesador con mejor rendimiento y más efficiente con respecto al consumo de energía que ARM ofrece. La arquitectura ARMv7 también incluye la tecnología NEON™ para incrementar el procesamiento digital de señales que se tiene en un 400% ! También ofrece una mejora en punto flotante, para poderse adaptar a las necesidades que existen con la siguiente generación de gráficos 3D, las leyes de física que se aplican a los juegos, así como aplicaciones de control embebidas.( Un controlador embebido, término que de hecho NO conocía ja!, es un dispositivo que lleva acabo control embebdio...Y control embebido es un subconjunto de la adquisición de datos, esto es, el sistema de entrada/salida que se tiene no está conectado con una PC externa, sino que la PC o el procesador que está corriendo está realmente incorporado fisicamente con el dispositivo de entrada y salida.)
*Hasta 1 GB de memoria para las aplicaciones (256 MB RAM, 768 MB memoria virtual) * Un sistema operativo de tipo Linux * Un acelerador de gráficos 3D con soporte para OpenGL ES 2.0 (Si son medios neewbies, como yo a esto, (which is totally cool too, en algun lado se empieza!) Un acelerador de gráficos es una especie de adaptador de video que contiene su propio procesador para mejor los niveles de rendimiento. Estos procesadores están especializados en las transformaciones de computo gráfico, así que alcanan mejores resultados que la CPU de uso general type que usa la computadora. Además liberan el resto del CPU, para que pueda hacer otras operaciones, mientras que el acelerador de gráficos se encarga del trabajo sucio i.e. las computaciones gráficas.) *32 GB en almacenamiento interno *Pantalla de tipo Touch Screen
...Y muchas muchas más cosas, que en la página oficial pueden checar...
Entremos ahora a lo interesante. ¿Cómo podría yo, una chica solitaria de ingeniería en la UNAM jugar a gusto con este dispositivo?
-Hmmm, pensemos un rato...Thinking thinking thinking hard...Podría usarlo! Es lo suficientemente lindo para divertirte mucho si lo pudiera usar, además está lindo para presumirse en todos lados!...Peeero eres una estudiante de ingeniería de la UNAM... y en computación, así que a eso AUN le falta!!....mmmm...oh I know!...Programemosle una aplicación hecha por nosotros!!!
Lo primero es que entendamos lo que queremos hacer: Queremos crear un ambiente en el cual podamos probar y compilar aplicaciones que bajaremos al celular.Es entonces muy importante crear un ambiente que pueda compilar y correr programas tanto en plataformas ARM (la plataforma del celular)) como x86 (Plataforma de la PC). Debido a que el N800 corre en un procesador ARM, no podemos tomar los bianrios que se generen en nuestra máquina e insertarlos así nomás al celular y esperar que funcionen. No funcionará debido a que cada procesador tiene su PROPIO set de instruciones, así que el bianrio creado por un compilador en un procesador x86 no significará nada en un procesador ARM, es por esto que debemos agregar una capa de abstración: La solución es INSTALAR Scratchbox. Scratchbox es un compilador cruzado (Un compilador cruzado según Wikipedia es un compilador capaz de crear código ejecutable para otra plataforma distinta a aquélla en la que él se ejecuta.) el cual hace el desarrollo de aplicaciones embebidas en Linux mucho más fácil, además de eso brinda una serie de herramientas para compilar cruzado e integrar toda una distribución de Linux. Con los siguientes 3 comando, se instalará scratchbox, se volverá ejecutable y después se correrá: wget http://repository.maemo.org/unstable/5.0beta2/maemo-scratchbox-install_5.0beta2.sh chmod +x maemo-scratchbox-install_5.0beta.sh (Entre este paso y el siguiente, recomiendo mucho salirse de su sesión actual que tienen en su máquina, en mi caso no cobró efecto imediatamente.) ./maemo-scratchbox-install_5.0beta2.sh –u USER -F
Con estos pasos se debió haber instalado scratchbox y haber recibido un mensaje como el siguiente: Installation was successful!
----------------------------
You now have Scratchbox 1.1.4 'apophis' release installed.
Scratchbox cannot be run as user root. Instead, use your normal login
user account. Add additional scratchbox users and sandboxes with the
following command (outside scratchbox with root permissions):
# /scratchbox/sbin/sbox_adduser USER yes
Running this command will create sandbox environment for that user and
add user to the 'sbox' scratchbox user group.
You will need to start a new login terminal after being added to the
'sbox' group for group membership to be effective.
Login to scratchbox session using the following command (as user):
$ /scratchbox/login
Refer to scratchbox.org documentation for more information re scratchbox:
Una vez que ya se corrió eso, en una terminal se debe escribir: ~$ /scratchbox/login (Entre este paso y el anterior, recomiendo mucho salirse de la sesión actual que tienen en su máquina, en mi caso no cobró efecto imediatamente, y me dijo unas cosas acerca de que NO tenía los permisos para hacer esa operación) Con ese comando debe salir lo siguiente: You dont have active target in scratchbox chroot. Please create one by running "sb-menu" before continuing Welcome to Scratchbox, the cross-compilation toolkit!
Use 'sb-menu' to change your compilation target.
See /scratchbox/doc/ for documentation.
sb-conf: No current target
[sbox-: ~] >
Si ya se tiene el prompt de sbox es que se instaló scratchbox adecuadamente, ahora lo que se debe hacer es instalar el sdk de maemo dentro de nuestro entorno. (El sdk de maemo nos permitirá desarrollar aplicaciones para el celular,recordemos que el n900 corre sobre el sistema operativo de maemo.) Para instalar se debe escribir: wget http://repository.maemo.org/unstable/5.0beta2/maemo-sdk-install_5.0beta2.sh chmod +x maemo-sdk-install_5.0beta2.sh ./maemo-sdk-install_5.0beta2.sh
Dentro de esta instalación, yo selecioné los valores que venían por default. Una vez que se termina la instalación se nos presenta en la consola un mensaje que dice lo siguiente:
Nokia EUSA binaries
-------------------
The package maemo-explicit is a metapackage of Nokia EUSA licensed
binaries which can be installed to scratchbox targets. It is highly
recommended to install this package on both targets to ensure a fully
working system.
If you want to install these, login to scratchbox (see commands above)
and run the command 'fakeroot apt-get install maemo-explicit' for both
armel (CHINOOK_ARMEL) and i386 (CHINOOK_X86) targets.
Happy hacking!
Lo que este mensaje basicamente nos está diciendo es que el paquete que acabamos de instalar contiene binarios que se pueden instalar como objetivos o "targets" dentro de scratchbox.Un target u Objetivo dentro de Scratchbox es una "caja de arena" configurada.(y una "caja de arena" dentro de Scratchbox es simplemente un área definida para cada usuario.) Así que precisamente hagamos esto que nos dice el mensajito: Nos volvemos a meter a scratchbox:
pete@ubunt:~$ /scratchbox/login
Welcome to Scratchbox, the cross-compilation toolkit!
Use 'sb-menu' to change your compilation target.
See /scratchbox/doc/ for documentation.
[sbox-CHINOOK_ARMEL: ~] >
Instalaremos el paquete explicito de maemo, al correr lo siguiente:
fakeroot apt-get install maemo-explicit
Una vez que la actualización sucedió. nos debemos cambiar al otro obejtivo que está ya "build" al invocar el comando en el menu sb.Esto hara que salga un sistema de menu, y usanado las flechitas selecione la opcion de Activate a target, y escoje el ambiente que aun no se ha actualizado, en este caso es CHINOOK_X86. Se debe correr el mismo comando de la vez pasada y ya deberíamos tener ambos ambientes listos calistos!
Ahora lo probaremos graficamente: Abriremos otra terminal para probar graficamente que el sistema maemo está ya corriendo, también compilaremos un programa de prueba y lo correremos sobre el objetivo ARMEL . En la nueva terminal, correremos primero los siguientes comandos:
sudo apt-get install xserver-xephyr
Con este comando se instala el X server embebido, el cual se requiere para probar correr la emulación gráfica del N900. Posteriormente se deberá correr el siguiente comando:
Con esto se prende el servidor Xephyr .( el servidor Xephyr es un servidor basado en KDrive, KDrive es una pequeña implementación del server que hay en el sistema X Window.Xephyr tiene como objetivo o "target" de framebuffer una ventana localizada dentro de un host X Server.->Un framebuffer representa cada uno de los píxeles de la pantalla como localidades de memoria en RAM) Con esto lo que se verá es que se abrió una nueva ventana: * Ahora entremos a Scratchbox y al objetivo de X86.
$ /scratchbox/login [sbox->:~]> sb-conf se FREMANTLE_X86
* Hacemos que la variable DISPLAY corresponda a la configuración dada para el display que hay en el servidor Xephyr.
[sbox-FREMANTLE_X86: ~] > export DISPLAY=:2
* Prendemos el framework de la IU (Interfaz de Usuario) .
[sbox-FREMANTLE_X86: ~] > af-sb-init.sh start
Con esto se verá el framework de la UI lista y corriendo en la ventana Xephyr
El framework UI realmente es suuuper lindo. Después jugaremos más con él. Por ahora sólo quería que todos lo tuvieran trabajando. Regresemos a lo que queríamos hacer... Un aplicación "HolaMundo" para el n900: Abra otra terminal y vayas a su directorio de home y allí debes crear un nuevo archivo en el cual pegaremos lo siguiente:
#include stdlib.h /* EXIT_* */ #include stdio.h /* Introduce types and prototypes of GTK+ for the compiler. */ #include
int main(int argc, char** argv) {
/* We'll have two references to two GTK+ widgets. */ GtkWindow* window; GtkLabel* label; GtkWidget *image;
/* Initialize the GTK+ library. */ gtk_init(&argc, &argv);
/* Create a window with window border width of 12 pixels and a title text. */ window = g_object_new(GTK_TYPE_WINDOW, "border-width", 12, "title", "Hello GTK+", NULL);
/* Pack the label into the window layout. */ gtk_container_add(GTK_CONTAINER(window), GTK_WIDGET(label));
/* Show all widgets that are contained by the window. */ gtk_widget_show_all(GTK_WIDGET(window));
/* Start the main event loop. */ g_print("main: calling gtk_main\n"); gtk_main();
/* Display a message to the standard output and exit. */ g_print("main: returned from gtk_main and exiting with success\n");
/* The C standard defines this condition as EXIT_SUCCESS, and this symbolic macro is defined in stdlib.h (which GTK+ will pull in in-directly). There is also a counter-part for failures: EXIT_FAILURE. */ return EXIT_SUCCESS; }
Guarda el archivo como maemo_hello.c. y copialo como se demuestra a continuación:(Se ha dejado mientras prendido el scratchbox, asi como se dejó corriendo la ventana Xephyr )
Observese donde esá su directorio de home dentro de scratchbox, ahora si en la ventana que tiene corriendo scratchbox escribes ls, deberás de ver un archivo maemo_hello.c dentro de tu directorio de home: [sbox-FREMANTLE_X86: ~] > ls :~] maemo-sdk-rootstrap_5.0beta2_armel.tgz maemo_hello sb-conf MyDocs maemo-sdk-rootstrap_5.0beta2_i386.tgz maemo_hello.c
Y ahora usando el mismo comando de sb-menu que habiamos usado antes,verificamos que estemos sobre el objetivo de ARMEL. (Esto hace que los binarios que compilemos sean hechos especificamente para el N800) . Ahora simplemente compilamos: gcc -o maemo_hello maemo_hello.c `pkg-config --cflags gtk+-2.0 hildon-1` -ansi -Wall `pkg-config --libs gtk+-2.0 hildon-1`
El archivo bianrio generado puede ser copiado a cualquier celular n900 y corrido sin ningun problema. Ahora lo unico que debemos hacer, es probarlo sobre nuestro ambiente de scratchbox (Que justamente está emulando el celular, tonz aunque no tengamos aun el celular, nos permitirá ver la aplicación como si se hubiese corrrido sobre el n900) Para probarlo, sobre la terminal que tiene el scratchbox, ponemos a la variable de display=2, lo cual como ya se explicó antes, provoca que se apunte al Xephyr server, posteriormente corremos el script para prender el ambiente de prueba de maemo:n export DISPLAY=:2
af-sb-init.sh start
Saldrán muchas letritas aqui, espera a que termine, y una vez listo aprieta enter, verás el prompt de scratchbox de regreso, y ahora ponremos: ./maemo_hello Y finalmente deberás tener una ventanita similar a lo siguiente:
Y así hemos hecho nuestro propio HolaMundo para celulares n900!! ñ_ñ OJO:Los pasos puestos en el blog, son para maquinas de 64 bits!! Refrencias: http://maemo.org/development/sdks/maemo_5_beta_2_sdk_installation/#close=1 http://www.reviewlinux.com/forums/news/12492-pete-savage-howto-scratchbox-maemo-4-0-ubuntu-gutsy-nokia-n800-dev-environment.html






.png)
.png)


